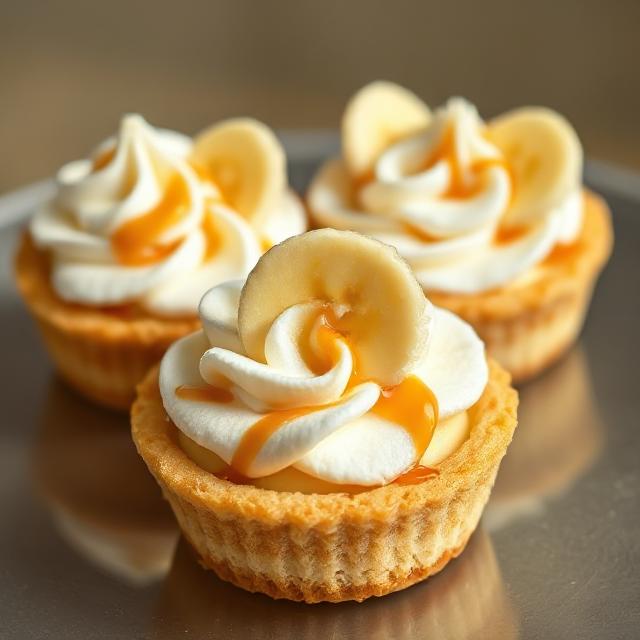

If you love creamy desserts, fresh bananas, and simple recipes that don’t require turning on the oven, you’re in for a treat. These No Bake Mini Banana Cream Pies are the perfect combination of sweet, smooth, and crunchy. Whether you’re preparing a quick dessert for a family dinner or hosting a summer party, this recipe is a showstopper that takes minimal effort and delivers maximum flavor.
In this post, we’ll walk you through everything you need to know about making no bake mini banana cream pies — from ingredients and steps to storage tips, variations, and frequently asked questions. Get ready to wow your taste buds and impress your guests with this delightful dessert.
Why You’ll Love These No Bake Mini Banana Cream Pies
There are many reasons why this recipe is a favorite among dessert lovers:
-
No oven required: Ideal for warm days when you want to avoid the heat.
-
Quick and easy: You can whip this recipe up in under 30 minutes (excluding chilling time).
-
Perfectly portioned: These mini pies are great for individual servings — no messy slicing required.
-
Delicious texture: A buttery graham cracker crust, creamy banana filling, and fluffy whipped topping create a satisfying dessert experience.

Ingredients You’ll Need
Here’s a quick list of what you need to make these mini pies:
For the crust:
-
1 ½ cups graham cracker crumbs
-
⅓ cup melted unsalted butter
-
2 tablespoons granulated sugar
For the filling:
-
1 (3.4 oz) box instant vanilla pudding mix
-
1 ½ cups cold milk
-
1 cup heavy whipping cream (whipped until stiff peaks form)
-
2 ripe bananas, sliced
-
1 teaspoon vanilla extract (optional for extra flavor)
For the topping:
-
Additional whipped cream
-
Banana slices
-
Crushed graham crackers or caramel drizzle (optional)
Step-by-Step Instructions
Step 1: Prepare the Crust
In a mixing bowl, combine the graham cracker crumbs, melted butter, and sugar. Stir until the mixture resembles wet sand. Spoon about 2 tablespoons of the crust mixture into each mini pie tin or cupcake liner. Press it down firmly with the back of a spoon or small glass. Set aside or refrigerate while preparing the filling.
Step 2: Make the Pudding
In a separate bowl, whisk together the instant vanilla pudding mix and cold milk until smooth and slightly thickened (about 2-3 minutes). Let it sit for 5 minutes to fully thicken.
Step 3: Fold in Whipped Cream
Gently fold in the whipped cream into the pudding mixture to create a light, fluffy filling. If using, add vanilla extract for enhanced flavor.
Step 4: Layer the Pies
Place a few banana slices on top of each chilled crust. Then spoon or pipe the banana cream filling over the bananas, filling each cup to the top.
Step 5: Chill
Place the mini pies in the refrigerator for at least 2 hours, or until set.
Step 6: Add Toppings and Serve
Before serving, top each pie with a swirl of whipped cream, fresh banana slices, and an optional sprinkle of crushed graham crackers or a drizzle of caramel.
Tips for Best Results
-
Use ripe bananas for optimal sweetness and flavor.
-
Chill the whipped cream and mixing bowl before whipping for the best texture.
-
Refrigerate the pies for a few hours to allow the flavors to meld and the filling to firm up.
-
Add toppings right before serving to prevent bananas from browning.
Make It Your Own: Variations to Try
-
Chocolate Twist: Use chocolate pudding instead of vanilla for a rich, chocolatey version.
-
Nutty Crunch: Add chopped nuts to the crust or sprinkle on top.
-
Tropical Touch: Mix in some crushed pineapple with the banana layer.
-
Cookie Crust: Substitute graham crackers with crushed Oreos or shortbread cookies.
How to Store Mini Banana Cream Pies
Store these pies in an airtight container in the refrigerator for up to 3 days. If you want to make them ahead, prepare the crust and filling in advance, but add fresh bananas and toppings just before serving for the best appearance and taste.

Are They Freezer Friendly?
While the crust and pudding can technically be frozen, bananas and whipped cream tend to lose their texture when thawed. For best results, enjoy these pies fresh or within a couple of days.
Frequently Asked Questions (FAQs)
-
Can I use homemade pudding instead of instant?
Yes, homemade pudding works beautifully in this recipe. Just make sure it’s fully chilled and thickened before folding in the whipped cream. -
Can I make these pies dairy-free?
Absolutely. Use a dairy-free pudding mix, almond or coconut milk, and a plant-based whipped topping for a vegan-friendly dessert. -
How far in advance can I make these?
You can make them up to 24 hours in advance, but for the best texture, add banana slices and whipped cream right before serving. -
Do I need to use a pie tin or special molds?
No. You can use cupcake liners, ramekins, or silicone muffin cups. Choose what works best for your presentation style. -
Can I use pre-made graham cracker crusts?
Yes, mini store-bought graham cracker crusts are a great shortcut and work perfectly. -
How do I prevent the bananas from turning brown?
Brush banana slices with a little lemon juice or add them right before serving to maintain their color. -
Can I make this with other fruits?
Definitely. Strawberries, mangoes, or blueberries also pair well with the vanilla cream base. -
Is it possible to use Cool Whip instead of homemade whipped cream?
Yes, Cool Whip is a convenient alternative and works just fine in both the filling and topping. -
How many pies does this recipe make?
This recipe yields about 8 to 10 mini pies, depending on the size of your molds. -
Can I turn this into a full-sized pie?
Yes! Simply press the crust into a 9-inch pie dish and layer the filling and toppings as usual. -
Is this dessert suitable for kids?
Absolutely. It’s kid-friendly, mess-free, and fun to eat. You can even make it a family activity. -
Can I add gelatin for a firmer texture?
Yes. Adding a small amount of gelatin to the pudding mix can give you a more set texture, especially if transporting the pies.
Conclusion
These No Bake Mini Banana Cream Pies are the ultimate go-to dessert for anyone who loves a creamy, fruity treat that’s simple and satisfying. Whether you’re an experienced baker or a beginner in the kitchen, this recipe is easy to follow and guaranteed to please a crowd.
If you found this recipe helpful and delicious, don’t forget to follow us on Pinterest for more inspiring, no-fuss dessert ideas. Be sure to save, pin, and share this recipe with your friends and followers — it helps support our blog and brings more sweet content your way!